Makeup Frenzy Makeup Looks: Smoky Eyes and Style Tips
Create Makeup Frenzy makeup looks with smoky eyes, gray lips, and polished styling. Follow a monochrome tutorial and learn how to finish themed rounds.
Jump to
How to Create Makeup Frenzy Makeup Looks That Fit the Theme
A dramatic eye and a clean lip combo can give your character an entirely different personality. Makeup Frenzy makeup looks need to communicate the round’s theme, so your color choices matter as much as your eyeliner. Start your Makeup Frenzy makeup looks with a clear palette, then build the face before adding finishing details.
In this Roblox experience, you create makeup, style your character, compete in themed rounds, and vote on other players’ looks. That makes the theme your starting point: read it before committing to a complexion, eye color, or hairstyle.
For a black, white, and gray round, keep that palette consistent across the whole character. A smoky eye fits naturally, but colored lips or eyes can pull the finished design away from the prompt.
Use this monochrome combination as a starting point:
| Part of the look | Color combination |
|---|---|
| Complexion and concealer | White |
| Cheek and nose contour | Black, blended into the base |
| Eyeshadow | Black with gray inner corners |
| Eyeliner and brow stamp | Black |
| Lips | Gray fill, black liner, white gloss |
| Eye color | Gray |
| Decorative accents | White star and white inner-corner glitter |
Choose the overall mood before you start painting. You can emphasize gothic drama through dark eyes and strong brows, or keep the same palette softer by reducing the intensity of the contour and shadow. Treat those as styling choices within the theme.
Give the face one focal point. If you want the eyes to lead, spend your detail work on the smoky gradient and wing. If you prefer a statement lip, make the gray-and-black blend deliberate and keep the surrounding makeup simpler.
Build a Black, White, and Gray Look Step by Step
This monochrome design combines sculpted cheeks, smoky eyes, and glossy gray lips. Build your Makeup Frenzy makeup looks in that order so each new detail sits on a finished base.
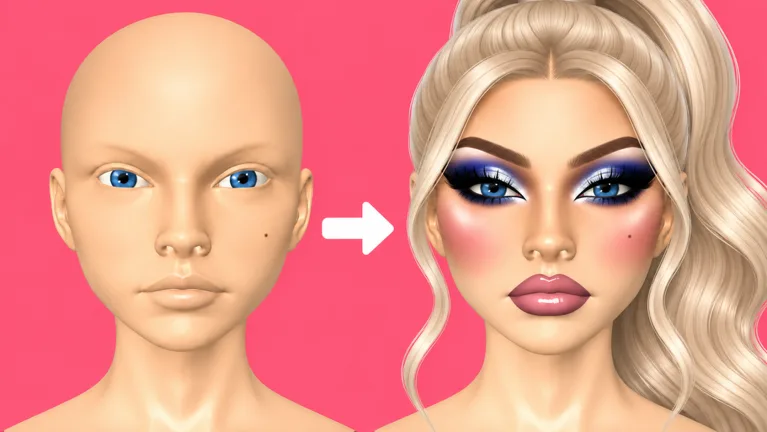 Image: Roblox / ciao kombucha fanclub
Establish the complexion and contour
Start with a white complexion. Rotate the head to cover the back and check beneath the chin; looking only at the front can leave parts of the head outside your chosen palette.
Apply black contour around the cheeks and cheekbones, then blend it with the beauty blender. Keep checking the whole face as you work. The goal is visible dimension with softened edges, rather than a dark stripe that dominates the cheek.
Zoom in for the nose contour. Use a smaller brush for this narrow area, then blend the dark marks before moving on. Resist repeatedly adding black while you are still deciding whether the existing contour needs more blending.
Add white concealer
Place white concealer beneath the eyes, on the chin, and on the forehead. Blend those areas to restore brightness around the darker sculpting.
Check the transitions between the concealer and contour. Keep the light areas distinct enough to shape the face, but soften abrupt borders. Zoom out before continuing so you can judge the complexion as a whole.
Create the smoky eye
Apply black eyeshadow, then add gray toward the inner corners. Blend the shadow edges while preserving the contrast between the darker outer area and lighter inner area.
Reduce your brush size before drawing eyeliner. Create the wing, connect it to the rest of the liner, and compare both eyes.
Keep the wing manageable. A short, connected shape gives you less to correct than an oversized sweep, especially while you are learning how the brush responds.
Finish brows and lips
Select a black brow stamp and adjust its size to fit the face. Check its proportions against the eyes before adding more detail elsewhere.
For the lips:
- Fill the upper and lower lips with gray.
- Outline both lips in black.
- Reduce the blender’s size and strength.
- Soften the boundary between the gray center and dark outline.
- Apply white lip gloss.
Preserve some contrast at the lip edge. Blending the entire mouth too aggressively can spread the dark color and lose the shape you just created.
Add the final accents
Set the eye color to gray and choose lashes. Add white glitter at the inner corners for a brighter finish.
A white star beside the eye provides another decorative option. Shape Stencils is a paid game pass, so keep the underlying makeup complete before making a shape accent part of your plan.
Use Brush Controls to Keep the Makeup Clean
The difference between tidy and messy Makeup Frenzy makeup looks often comes down to how carefully you adjust the tools. Brush size, strength, blending, and zoom all deserve attention before another layer of color.
Use broader strokes for larger areas and smaller strokes for narrow details. Change your settings as you move between features instead of carrying the same brush setup through the entire face.
| Tool or control | Adjustment to practice | Detail to check |
|---|---|---|
| Brush size | Reduce it for nose contour, liner, and lips | Color stays within the intended area |
| Strength | Lower it when refining a dark edge | The next stroke does not overwhelm the existing makeup |
| Beauty blender | Work along the boundary between colors | The transition softens while the shape remains visible |
| Zoom | Move closer for small features, then zoom out | Details also look balanced across the whole face |
| Undo | Remove an unsuitable application | The replacement color fits the palette |
| Brow stamp size | Resize the stamp for the face | Brows feel proportionate to the eyes |
Work in small passes when applying black. Its contrast against a white base makes placement especially noticeable. Add the shape, blend its edge, and reassess before deepening it.
Keep eye shadow and eyeliner visually separate. Blend the shadow first, then concentrate on the sharper wing. After adding lashes, look again at how much liner remains visible; large lashes can cover the detail beneath them.
For lip blending, target the meeting point between liner and fill. Use a smaller blender so you can soften that boundary without spreading the outline across the mouth.
When a color application looks wrong, use undo and choose again. Fixing the mistake immediately keeps later steps from becoming attempts to hide it.
Before using a tool, check that it is the one you intended. Eyeliner and eyebrow pencil serve different parts of the face, and confusing them can send a careful design off course.
Style the Character Around the Finished Face
Hair, lashes, and eye color complete Makeup Frenzy makeup looks. Coordinate them with the makeup you have already built so the character feels cohesive.
For the monochrome design, gray eyes continue the palette through the center of the face. Keep checking them alongside the black shadow and white accents; each detail contributes to the same overall effect.
Choose lashes after completing the eye makeup. Look at the resulting silhouette and decide whether the lashes leave enough room for the wing and smoky gradient to remain visible.
Hair also needs a placement check. Use its adjustment controls to move it forward or down as needed, then inspect how it sits around the forehead and face.
Leave room for the features you spent time creating. A hairstyle that covers the eye area can hide a star accent, brow shape, or carefully blended shadow. Try a different hairstyle if adjusting the current one still obscures your focal point.
Use this checklist before moving on:
| Styling detail | What to inspect |
|---|---|
| Eye color | It follows the round’s palette |
| Lashes | Their size works with the eyeliner |
| Hair position | The style sits cleanly around the head |
| Face visibility | Hair leaves the main makeup details visible |
| Glitter | Placement stays focused around the inner corners |
| Shape accent | Its color and position complement the eye makeup |
Makeup Frenzy makeup looks can also vary within the same color scheme. For a more dramatic version, emphasize the dark outer shadow and black lip outline. For a lighter variation, reduce the strength of the dark applications and make the gray transitions more prominent.
Change one element at a time while practicing. Compare the character with different lashes or hair before changing the entire face. That makes it easier to identify which styling choice supports your design.
Plan Your Round and Understand Optional Upgrades
Themed rounds require you to finish while managing the time available. Detailed eyeliner can absorb attention quickly, so complete the essential face before working on decorative extras.
Use this sequence to organize your Makeup Frenzy makeup looks:
- Choose the theme’s palette.
- Complete the complexion, contour, and concealer.
- Build the eyes and brows.
- Finish the lip combination.
- Select and position hair and lashes.
- Add glitter or a shape accent if time remains.
- Check the entire character.
Get eyes, brows, and lips into place before repeatedly refining one feature. A partially finished face can leave your intended style hard to read, even when its eyeliner is carefully drawn.
During voting, examine how each look interprets the theme. Compare its palette, blending, and overall finish. Apply that same checklist to your own character before the round ends; it gives you specific details to improve next time.
What the game passes include
As of October 13, 2026, these optional passes are offered in Makeup Frenzy:
| Game pass | Price | Included feature |
|---|---|---|
| VIP | 349 Robux | VIP makeup tools, voting backgrounds, and three daily theme choices |
| Second Hair Slot | 79 Robux | A permanent second hair slot |
| Shape Stencils | 119 Robux | Permanent access to shape stencils |
| My Lookbook - Unlimited Slots | 139 Robux | Unlimited saved-look slots |
Match any purchase to the feature you actually want to use. Choose Shape Stencils for decorative shapes, or Second Hair Slot when you want another hair slot for your styling. Choose the Lookbook upgrade if unlimited saved-look slots are the feature you need.
Keep those benefits separate when deciding. The stencil, hair, and Lookbook passes each describe a specific addition, while VIP includes its own tools, backgrounds, and daily theme choices.
Ready to practice? Play Makeup Frenzy on Roblox and start with a focused palette. Finish the face, inspect the styling, and add the smallest details last.
FAQ
How do I create Makeup Frenzy makeup looks for a black-and-white theme?
Use a white complexion, blended black contour, black-and-gray smoky eyes, black brows, and gray lips with black liner. Set the eye color to gray and keep decorative accents white. Carry the palette through the whole character.
How can I keep eyeliner from taking up the whole round?
Reduce the brush size and draw a manageable wing before connecting it. Complete both eyes, then move on to brows and lips. Return to small corrections after the essential makeup and hair are finished.
How do I make the gray lip combination look cleaner?
Fill the lips with gray, add black liner, and use a smaller blender at reduced strength along the boundary. Keep the dark edge visible, then finish with white gloss.
Which pass adds decorative shapes to makeup looks?
Shape Stencils permanently unlocks shape stencils. It costs 119 Robux as of October 13, 2026. Build the eye and lip makeup first, then use a shape accent to complement the finished design.
Continue with
 Makeup Frenzy Style Ideas: Smoky Eyes and Gothic GlamExplore Makeup Frenzy style ideas with smoky eyes, grayscale lips, and gothic details. Make a themed look, blend cleanly, and finish before the round ends.
More in Looks
Makeup Frenzy Best Looks: Smoky Eyes and Gothic Glam
Explore Makeup Frenzy best looks with grayscale glam, smoky eyes, blended lips, and styling tips. Build a cohesive face for your next themed Roblox round.
Makeup Frenzy Face Ideas: Smoky Eyes and Gothic Looks
Explore Makeup Frenzy face ideas with smoky eyes, gray lip combos, and gothic details. Build a themed Roblox look with blending tips and finishing touches.
Makeup Frenzy Faces Roblox: How to Create Standout Looks
Makeup Frenzy faces roblox: learn to blend contour, shape brows, create smoky eyes, and finish a grayscale look. Build your themed face with confidence.
Makeup Frenzy Winning Looks: A Guide to Themed Rounds
Create Makeup Frenzy winning looks with a grayscale makeup walkthrough, blending tips, smarter round planning, and a clear guide to optional Roblox passes.
Join the community
Official channels for news, updates and player help: